Our Home Reno Series: Stairways and Railings
The last time I wrote, I promised to share my new home stairway and railing plans with you. If you remember, there is a direct line of site between the front and back patio doors. Here’s a photo to jog your memory. You can stand at the front door and see the back patio. Bad Feng Shui? (Probably.)

I countered this “bowling alley effect” by changing the direction of the floor under the doorway from the dining to the kitchen. And I’m also planning panel moldings in that same doorway and the entire living and dining rooms to further separate the spaces.
The loft stairs off our kitchen also present an opportunity to further that separation. And since the home’s stairs and railing were very traditional (and not my style exactly), I decided we should change it. My husband, bless his heart, agreed.
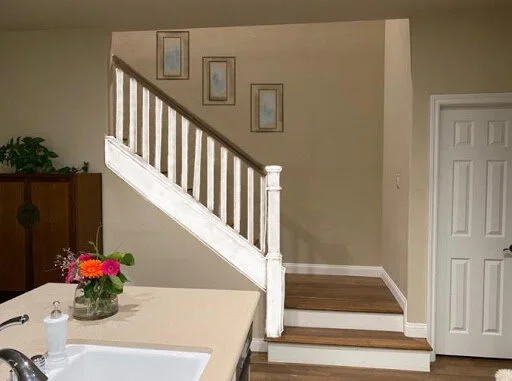
Here’s the before photo (Flowers courtesy of my darling son.):

While it was a pretty railing, you can see that the two bottom stair steps were just hanging out by themselves. Not to mention presenting a bit of a tripping hazard.
There was also an awkward wall cap (sometimes called shadow cap) in the loft above and I wanted to make it match the rest of the new stair railing. Here’s a couple before shots:


So, I finally found a stair contractor to help me rebuild the entire stair railing assembly. Here are some after pictures of how the railing looks now. It was very tricky to get the post proportionate to the first steps. But with a 9’ ceiling, I think we did alright. Here are the after pictures of the new railing and wall cap in the loft.


Due to building code restriction, the return railing between the rail and post could not be done at a 90-degree angle because it would be too sharp as your hand travels past it.
It’s not finished so I’ll be sure to circle back around to show you the finished product once they are painted and stained. In the meantime, here’s a sketch so you can see my concept for the finishes. We’re painting in another week but I'd like to show you what’s in my head now. =0)
I often use an app on my iPad to sketch over a photo or a scaled drawing as a way to see the finished product ahead of time. It’s called Paper 53. It’s a lot of fun. Doing this can help save you lots of money by seeing it this way first.
Here’s the icon so you can find it in the App store.

I’m very happy with how our new railing turned out and it’s so homey to have a staircase coming down into the kitchen as I always dreamed about.
Head’s up. I’m working on color schemes now and soon I’ll start sharing the fun stuff I know you’ll want to hear about. I mean, how much construction can one girl take?
See you next week!