Our Home Reno Series: Decorative Panel Molding
When I last wrote about our new home reno, I mentioned I would share my decorative panel molding and other molding ideas with you. So far, we’ve installed new baseboards in all the rooms with the new wood flooring.
Can I just say? Between the Pandemic and now the move to a new city, it is taking longer than expected to get anything done around here! Contractors are so busy. Are you finding the same to be true?
Anyway, as we continue with our upgrades, we’ll exchange the baseboards in other parts of the house where there is currently tile or carpet. So, in other words, this work will be done in a few phases.
Here are my selections for the decorative moldings throughout. These will be made of MDF (medium density fiberboard) which is already primed. I don’t recommend MDF on the lower parts of walls by the way, if you have kids. They can dent more easily than hardwood.
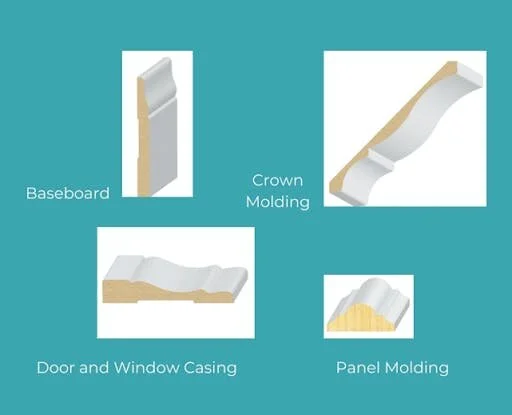
To figure where to place your decorative panel moldings, it comes down to math. The one I chose is only about 2” wide and can create the effect of real wall paneling, if done well. I am planning to use it in our living/dining room, the doorways leading from these rooms and possibly the stair wall in the kitchen.
Here’s a photo of our previous master bedroom. My husband and I did this work (well, my husband did most of the work himself…but what the hey)!

In our room, we used a paint grade plywood with the panel molding on top of it. Under the bay window, there was a fairly low wall space so it was easier to smooth coat the wall with plaster and paint it a semi-gloss in order to fool the eye into thinking it was also painted wood. (Here's a look without the furniture below).

In the case of our new home, I am planning to apply the panel molding directly to the existing walls. I’ll need to experiment because the walls have a heavy texture. In the end, I’m hoping not to have to do a smooth coat because it creates a toxic odor for days and is like brand new drywall which needs tons of paint. I plan to consult my finish carpeter to see what he recommends.
Here are a couple of sketches to show you how I’m thinking to arrange the panel molding. Nothing is set in stone yet but this is a good way to communicate to a my carpenter what I’d like to do.

Looking toward the dining room wall and niche.

The doorway to kitchen (same to hallway).

A large painting is planned over the fireplace but the moldings will surround it.
I think you get the idea. It will be quite a while before I’ll be able to share the end results of this project. Next, see my new staircase which is underway (and how I explained to my husband that we needed to replace it.)
Thanks for tagging along!
Are you ready to learn more about DIY Design for your own home? Check out the DIY Outlet for tips and courses about design.